One of the hardest things about learning photography is figuring out how to get sharp focus in photos. Nailing that tack-sharp focus seems like it would be the easiest part of taking a photo, but it can be surprisingly frustrating for new photographers!
When I first started practicing photography with my DSLR camera, my photos would sometimes be blurry whether I used manual or automatic focus. I just couldn’t figure out what I was doing wrong… until I mastered these 15 tips.
If you struggle with blurry photos too, you’ve come to the right place. In this article, I’ve listed everything a beginner photographer needs to know about capturing sharp photos no matter what environment you’re shooting in.
Whether you need to adjust your focus, use the correct camera settings, or figure out how to shoot in manual mode, taking photos with perfect, crisp focus will be a breeze once you know these photography tips.
This post may contain affiliate links. We may earn compensation when you click on the links in this post at no cost to you. For more information, see our terms and conditions. All opinions are my own.
1. Select the Center Focus Point
When using autofocus, it’s best to tell your camera which focus point you want to use instead of letting your camera decide. The center focus point is generally the most accurate.
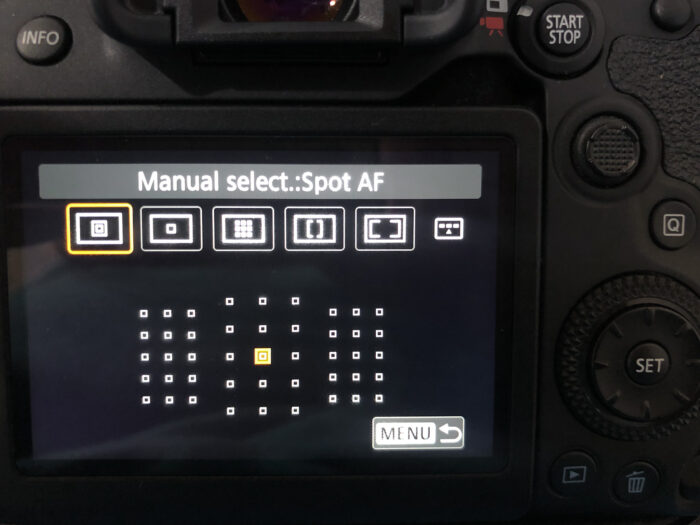
But what if you don’t want to position your subject in the center of the frame? To fix this, focus on your subject with the center point. Then, while half-pressing the shutter button, recompose your shot. Your focus will remain on the subject.
(Note: Half-pressing the shutter button will work only if you’re not using back-button focus, which is what I personally use. More on that in point number 3.)
If you want to read more about “recomposing” your photos, check out this blog post: Take Better Photos with Any Camera: Composition
2. Use the Correct Autofocus Mode
Autofocus is generally easier to use than manual focus when trying to capture that perfect shot. In low-light situations, such as when photographing the night sky, manual focus becomes necessary, but autofocus is usually better for other types of photography.
You need to select the correct autofocus mode out of 3 different modes for what you’re trying to shoot.
- AF-S (Nikon) / One shot AF (Canon) – This mode is best used with stationary subjects. It allows you to focus on your subject, and then recompose without refocusing on something else in the frame. This is ideal if you are using the center focus point but don’t want your subject to be in the center of the frame (such as when using the rule of thirds).
- AF-C (Nikon) / AI Servo (Canon) – This mode is for moving objects. The camera is continuously focusing on a subject as it moves as long as you have your shutter button half-pressed to focus. This is commonly used in sports and wildlife photography.
- AF-A (Nikon) / AI Focus AF (Canon) – This mode is a hybrid of the single shot and continuous modes. The camera will detect if your subject is stationary or moving, and focus automatically. However, the camera may not know exactly what you have in mind for the shot.
3. Switch to Back-Button Focusing
This tip was a real game-changer for me when I started learning photography. I struggled with getting tack-sharp focus in-camera, but switching to back-button focus instead of using the shutter button helped so much.
Some cameras, like my first camera (Canon Rebel T5), don’t have a button on the back of the camera dedicated to back-button focusing. For example, the Rebel T5 uses the zoom-out button to focus instead. When I upgraded to the Canon EOS 90D (pictured below), I made sure it had an actual AF focus button on the back because it was just that important to me.
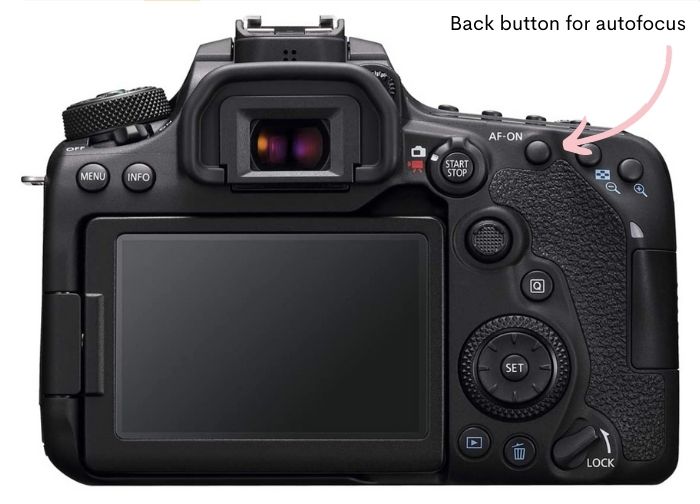
Here’s why back-button focusing works better than shutter focusing: when half-pressing the shutter button to focus, you might press the button too hard and take a photo too early. Or if you don’t leave your finger half-pressed on the shutter button, you will have to keep refocusing and recomposing in between every shot. If you separate the focus and shutter into 2 different buttons, you won’t have that problem!
4. Focus on the Eye
For getting tack sharp portraits, it’s especially important to focus on the eyes of your subject. Specifically, focus on the eye closest to you. When looking at a person’s face, the first thing you notice is a person’s eyes, so that is what should be in focus more than anything else.
This is very important when shooting with a wide aperture like f/1.0-f/2.0. The wider an aperture, the shallower the depth of field. For example, if you are shooting at a wide aperture like f/1.8 with your “nifty fifty” lens, only a small slice of the photo will be in focus. It can be easy to get the nose or the ear in focus instead of the eye when shooting with such a narrow depth.
5. Use Good Lighting
Although light is one of the most important aspects of photography, it may seem like it doesn’t have much to do with focus. However, having enough light is essential to getting sharp focus, especially if you don’t have a high-end camera.
Help your camera out by shooting with a good light source so that it can easily distinguish your subject from the background. Using natural light from a window or while you’re outdoors is always great, but a built-in flash can also help.
Recommended reading: The Best Time of Day to Take Photos
You need to understand the manual exposure triangle – that’s the relationship between ISO, shutter speed, and aperture. It’s not as complicated as it sounds! There are plenty of free guides out there about learning how to shoot in manual mode and how to use these 3 aspects of photography, but I’ll try to explain it as simply as I can. If you already know how to shoot in manual mode, you can skip ahead to the next point.
- ISO – This is how sensitive your camera sensor is to light. If the ISO number is low, the sensor is less sensitive to light, therefore your image will be darker. If the ISO number is high, the sensor will be more sensitive and make the image lighter.
- Shutter Speed – This is how long your shutter is open, measured in seconds or fractions of seconds. If your shutter is set at 1/500 of a second, this is a pretty fast shutter speed, and it’s often used to freeze an action shot. In this case, less light will enter your camera, and it will produce a darker image in low lighting environments. 1/10 of a second is a slow shutter speed that will let in a good bit of light. So, the longer your shutter speed, the more light you will have in your image. Continue reading to find out how a tripod can help you use a slow shutter speed and minimize camera shake.
- Aperture – This is how wide your lens opens to let in light, and it’s measured in f-stops. If you have a wide aperture, such as f/1.2 you will have a brighter image and more bokeh (blurry background). A narrow aperture such as f/16 will give you a darker image.
So how do these 3 things relate to sharp focus? Keep reading to find out.
6. Lower Your ISO
In low light situations, it can be tempting to increase your ISO to increase the exposure of your photo. However, this can add a lot of noise and grain to your photo, especially if you don’t have a high-end camera. A noisy photo can appear fuzzy.
If you have an entry-level camera, try to keep your ISO as low as possible and compensate for the low light by using a slower shutter speed or wider aperture. With a low-end camera, even an ISO of 1600 is pushing your luck if you don’t want a lot of noise.
7. Use a Faster Shutter Speed
Let’s say you have plenty of light but your subject is still a little blurry. If your subject isn’t completely still, you may need to use a faster shutter speed. In sports and wildlife photography, a fast shutter speed is necessary to eliminate motion blur and achieve a sharp image. Remember, using a fast shutter speed means that the image will be darker, so you’ll need to either boost your ISO or choose a wider aperture.

For a photo like this, I had to shoot at a somewhat fast shutter speed to capture the quickly moving fireworks. I had to raise the ISO and widen my aperture to let in more light. Any noise from the ISO was removed in post-processing.
8. Use the Sharpest Aperture
Most people want to use the widest aperture their lens is capable of because of something called “bokeh”. Bokeh is the out-of-focus portions of your image which give an artistic and professional look. Wider apertures not only let more light in, but they also produce more bokeh. However, the widest aperture is typically not the sharpest aperture.
The most accurate way to find out the sharpest aperture of your lens (or the “sweet spot”) is to look it up on the internet and find the exact specifications for your lens. Or to make it easier you can just estimate. Most lenses’ sweet spot is 2 or 3 f-stops up from the widest aperture. So, if your widest aperture is f/4, the sharpest aperture would be between f/8 and f/11. An f/2.8 lens sweet spot would likely be around f/4.
9. Use a Tripod
A sturdy tripod makes it easier to keep your camera completely still, eliminating camera shake. This is especially important when using slow shutter speeds. A 1-second shutter speed at any focal length is almost guaranteed to create camera shake. It’s nearly impossible to handhold your camera completely still, even for a few seconds.
Pro tip: If you don’t have a tripod with you, use a makeshift tripod such as a table, a railing, or another stationary object.
It’s important to note that even on a tripod, a little bit of movement can still happen. Simply pressing the shutter button can cause a small amount of vibration and camera shake, but there are ways to compensate for this. Press the shutter button softly or use a 2-second timer or remote shutter to ensure maximum stillness.
10. Learn How to Handhold Your Camera Correctly
Sometimes a tripod just isn’t available, and you don’t have anything to set your camera on either. This is when you need to know the best tips for handholding your camera. Your left hand should be supporting the lens from underneath rather than holding the top or the side of the camera. Keep your elbows pressed against yourself, and if possible, brace yourself against a tree or a wall to keep steady. Try to steady your breathing and only press the shutter after an exhale.
Turn on image stabilization (Canon) or vibration reduction (Nikon) on your lens, but only when handholding. On a tripod, this should be turned off. The stabilizer won’t work as well if your camera is already stable on the tripod.
With decent lighting, you can use this simple rule to decide the minimum shutter speed while handholding the camera . The rule is that shutter speed should equal 1/focal length or faster. This means if you use a 50mm focal length, the shutter speed should be 1/50 or faster. A 16mm focal length would result in a minimum shutter speed of 1/16 or faster. Any speeds slower than that will likely introduce undesired blur from camera shake.
[the_ad id=’2490′]
11. Adjust your Viewfinder
Most photographers look through the viewfinder of their cameras instead of at the LCD screen. If you are consistently taking slightly blurry photos and can’t figure out why, your viewfinder might not be adjusted to your vision. You can calibrate the viewfinder easily on most cameras by rotating the small dial next to the viewfinder until the view looks sharp.
12. Use Mirror Lockup Mode
If you’re using a DSLR camera (and not a mirrorless camera), you can change the settings to shoot in mirror lockup mode. When you take a photo, the mirror inside the camera flips up to expose the sensor to light, creating an image. In some cases, even this minor movement of the mirror can cause internal vibration which decreases the sharpness of your image. This setting is primarily useful at very slow shutter speeds and low light conditions.
13. Keep Your Camera Clean
If you have dirt on your lens, sensor, or filter, it can make your image muddy. To get that crisp focus, clean your lens and filter regularly with a dry microfiber cloth. The sensor takes a bit more effort, and you should only clean it after cleaning the lens and filter hasn’t fixed your problem.
You shouldn’t clean the sensor without the proper tools, because a damaged sensor is difficult if not impossible to replace. For your specific camera, look up tutorials for cleaning your sensor properly or take the camera to a service center for professional help.
14. Use a High-Quality Lens
If you purchased an entry-level camera as your first camera, it may have come with a lens known as a “kit lens”. These beginner lenses generally aren’t the best quality even though some can produce decent images. Prime lenses, on the other hand, are known for producing sharp images because of their high-quality glass. A prime lens is just a lens that can’t zoom in or out; it’s fixed at one focal length such as 50mm.
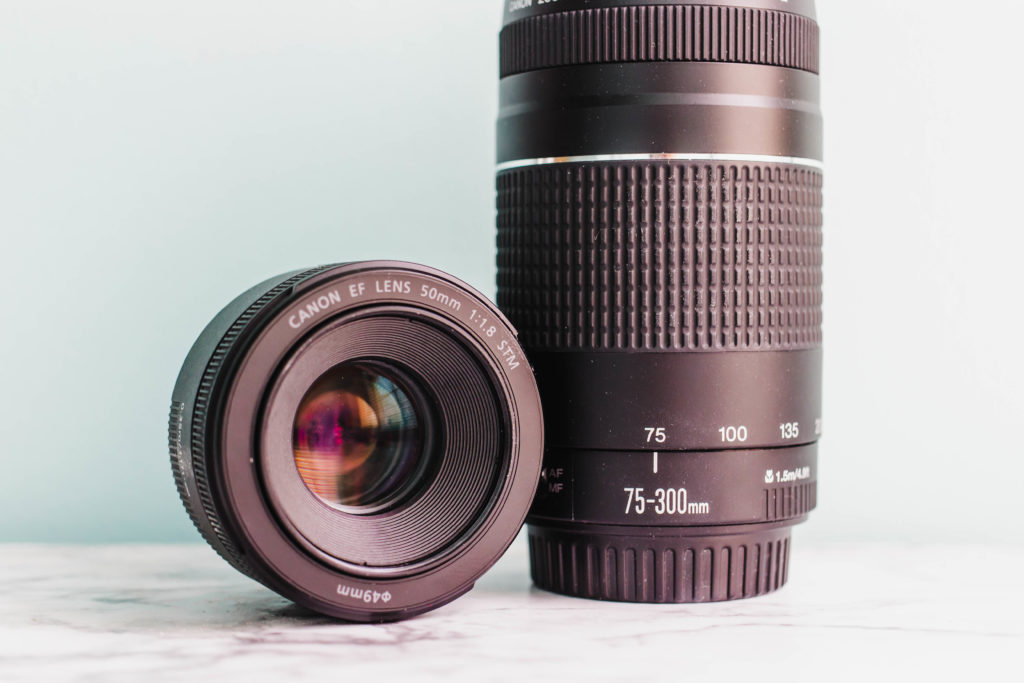
Zoom lenses can produce sharp images as well, but usually the high-dollar zoom lenses are the only ones that can compare to prime lenses. Zoom lenses also have a focal length that produces the sharpest photo, and that focal length is usually somewhere in the middle of the zoom range. So, if you have a lens with a zoom range of 18mm-135mm, you won’t get the sharpest possible image at 18mm or 135mm.
15. Find Out Your Minimum Focusing Distance
If you’ve ever tried to get really close to an object but found that the picture is blurry, it might be that you are too close for your lens to find focus. This is known as the minimum focusing distance, and it’s specific to each type of lens. For example, the minimum focusing distance of a 50mm f/1.8 lens is 1.15 feet (0.35 meters), so if you’re lens is closer than 1.15 ft to an object, it won’t be able to obtain focus. You can fix this by buying a macro lens. Macro lenses are designed to shoot extremely close to small objects such as insects, jewelry, or flowers, but some can also work well for portraits and landscapes.


You can see in these photos that the macro lens can achieve sharp focus even when very close to the object because it has a smaller minimum focusing distance. This is not cropped! I physically moved my camera as close to the pencils as possible.
I hope these tips for getting super sharp focus help you improve your photography skills! My advice is to work through these tips slowly and see which ones help you. And practicing photography is always beneficial to improve photography skills all around!
Don’t forget to join my email list for access to the free resource library. There you can download a Lightroom Mobile Preset as well as other travel and blogging freebies!
Recommended:
My Photography Gear: What’s in My Camera Bag?
Beginner Tips for DSLR Photography You Need to Know
How to Take Better Travel Photos