Have you ever tried to take a photo, and it just wasn’t quite how you envisioned it? You know what you’re trying to capture, but it just doesn’t look as good as you thought it would.
It’s especially hard with smartphones. While they are great tools for photography, they just don’t have the capabilities that a real camera does.
But what if you knew how to frame your shot and get a beautiful photo every time no matter what camera or phone you were using?
Photographers use composition to frame their subject and scene to get great looking photos. Knowing a few tips about how to compose your photo can take your photography skills to the next level!
Here’s my best tips to compose your shot and take better photos! With these little tweaks and adjustments to your composition, you’ll be taking better pictures in no time!
1. Rule of Thirds
If you have studied photography at all, you will have heard of the rule of thirds. This just means that your picture is separated into 3 equal parts, and the subject, or the focus of your photo, is lined up between those parts.
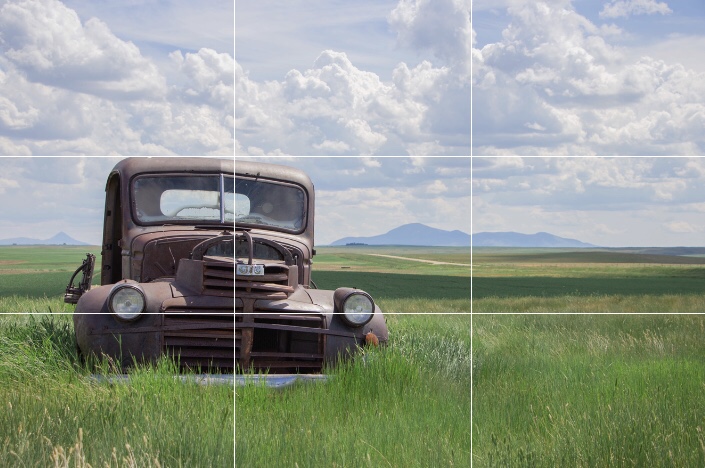
This photo I took of an old truck in Canada is a good example. The truck lies along the first line, and the mountains are on the second line. This gives a more interesting composition than just placing the truck in the middle of the frame.
The easiest way to accomplish this is to use gridlines on your camera or phone.
Placing your subject at one of these points gives interest to your photo and makes it look more professional.
2. Asymmetry
Part of the reason why the rule of thirds works is because of asymmetry. If a photo is not perfectly symmetrical, your eye is drawn to the subject even if it is off-center.
In the truck photo above, your eye is immediately drawn to the truck even though it isn’t centered.
Another way people use asymmetry in their photography is by using sets of three or odd numbers. Usually photographing three objects or people looks better than even numbers because of the balance; one subject is centered, and the others are on either side.
3. Symmetry
On the other hand, you also have symmetry which can make your photo look very balanced and pleasing to look at. Placing your subject dead center can draw focus exactly where you want it.

I took this ice cream photo in front of a wall at Wild Scoops in Anchorage, Alaska. As you can see, the ice cream is right in the center with equal stripes on either side. This is an instance where symmetry works better than the rule of thirds.
Symmetrical patterns and designs are also very eye catching, such as grids and lines.
4. Lines
Another important part of composing a photograph is to pay attention to “leading lines”. This just means that the lines in your picture, whether subtle or obvious, are leading your eye to the subject of your photo.

This photo of me on the bridge at Huntsville Botanical Gardens is a good example of leading lines. See how the railings of the bridge draw your eye from the edges of the photo to me in the center? That’s what leading lines are supposed to do: Lead your eye to the subject.
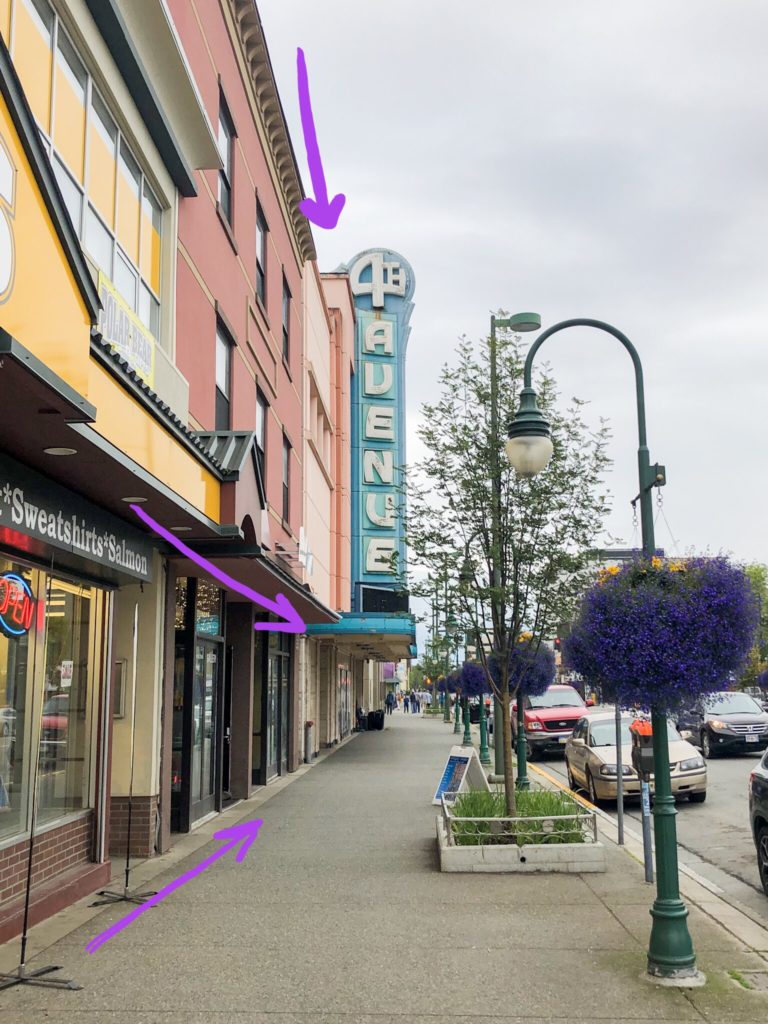
Here’s another example that is a little less obvious.

Notice that the lines of the buildings on the left point to what I wanted to be the subject of this photo — the old 4th Avenue sign.
5. Straight Horizons
While we’re on the subject of lines, the most important line in your photo is the horizon. You definitely want your horizon to be straight or else your photo will always look a little off. If you want to take better photos, this tip is the most important and the easiest to apply to your photography.

See how this photo looks crooked? It’s only because the horizon isn’t straight. Just a slight adjustment with a cropping tool can make it look it so much better!

Sometimes the horizon isn’t visible, and in that case you can use any other lines you see in the frame to straighten your photo. If you do this correctly while taking the picture, it will save you a lot of cropping and adjusting later.
Bonus Tip: Get Close to Your Subject
You want the focus of your photo to be solely on your subject. Getting closer to the subject will cut out some of the distracting background. Of course, if you want the background to be more visible, that’s fine. It all depends on what you want the subject of the photo to be.
This tip is especially true if you are taking the picture on your phone. Smartphone cameras take very wide pictures, so if you see a lot of the background, it takes away from your subject. DO NOT zoom in while using your phone camera if you can help it. Zooming in will decrease the quality and resolution of the photo. Just take a few steps forward!
I hope these simple tips help you to take better photos no matter what camera or phone you’re using! If you have any more helpful hints to improve photography skills, please leave them in the comments! I’d love to hear from you!
Don’t forget to subscribe below to be notified whenever more photography and travel content is posted!
Recommended:
Beginner Tips for DSLR Photography You Need to Know
Pingback: The Best iPhone Photography Tips for Beginners - Life Full of Light