iPhone cameras are quickly becoming one of the most convenient options for taking photos. They have the capability to take amazing photographs, but sometimes they just don’t turn out like you envisioned. There are a lot of ways you can improve your iPhone photography skills.
A lot of guides will tell you the basics of how your iPhone camera works and how to take better photos. However, most iPhone photography guides don’t tell you secret hacks and composition tricks that more advanced iPhone photographers use to get great images.
Here are my best advanced tips for iPhone photography so that you can take photos like a pro (even without a fancy camera!)
(If you want an easier start to iPhone photography, check out my beginner’s guide.)
This post may contain affiliate links. We may earn compensation when you click on the links in this post at no cost to you. For more information, see our terms and conditions. All opinions are my own.
1. Use Leading Lines
“Leading lines” is a term used in photography composition. This technique uses lines to lead your eye towards the subject in a photo. The lines can be subtle or obvious. You can see an example of subtle leading lines in the photo below.
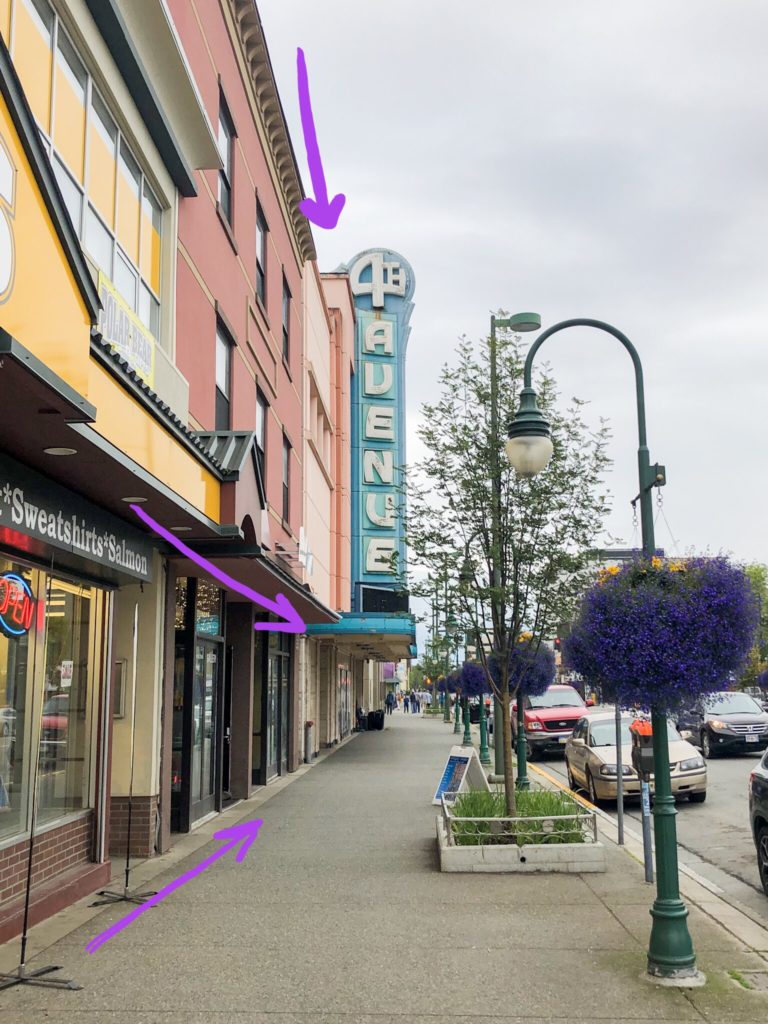
When I took this photo, I wanted the sign to be the main focus, so I used the lines of the building and sidewalk to point to the subject, “leading” your eye through the image.
2. Change Your Angle
Try changing your perspective when shooting something that’s been photographed many times. Taking a photo from a new angle can make your photos look fresh and interesting.
For example, get down low or up high or shoot through an opening like a hole in a fence or a keyhole. Changing up your composition by experimenting with different vantage points can really make an image unique.
3. HDR
Using the HDR setting while taking photos can help you get more balanced lighting in a photo with high contrast. So how does HDR work? HDR takes 3 photos all at once: 1 adjusted to the brightest parts of the photo, 1 adjusted to the darkest parts, and 1 in between. Then the 3 photos are combined creating an image with balanced lighting. The highlights won’t be blown out, and details won’t be lost in the shadows.
This setting is especially good for taking landscape photos. You can set your HDR to auto so that the smartphone camera detects when it’s needed, or you can use it manually. Just go to Settings > Camera > HDR.
4. The Rule of Thirds vs. Symmetry
One of the most basic rules of composing a photograph is to use the rule of thirds. The rule of thirds is basically this: place your subject off to the side instead of directly in the center of the photo. You can see this rule demonstrated in the photo below.
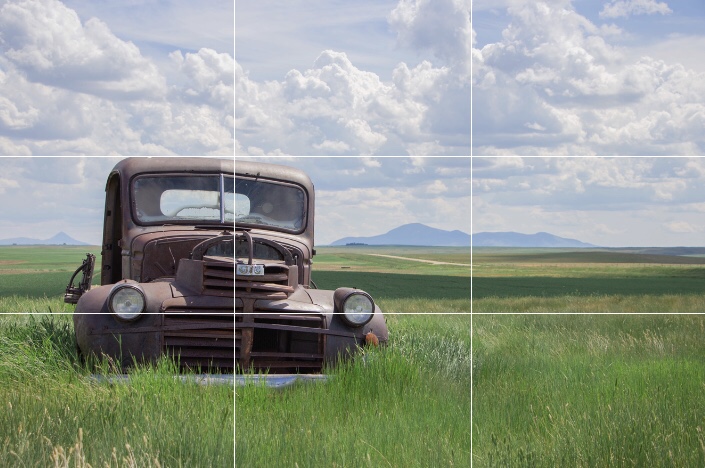
As you can see, the truck in this photo is lined up with the gridline marking the first third of the image. Using this technique can make your photos instantly look more professional.
I highly recommend turning on the gridlines on your iPhone camera to help you take advantage of the rule of thirds. To turn on the gridlines, go to Settings > Camera > and toggle Grid. When you take a photo, line up your subject along either the 1/3 or 2/3 line or on one of the four intersecting corners. Lining up the horizon with the lower or upper line can also give your photo a more interesting composition.
On the other hand, you can also use symmetry to create a beautiful photo. Symmetry is pleasing to the eye, and using the rule of thirds in every single photo can get a little boring. Try to get creative and experiment with your composition.
5. Use a Tripod
Even though most people don’t think of using a tripod for a phone, a tripod can have many advantages. One obvious use for a tripod is when the photographer wants to set a timer and be in the shot. However, there are other uses for a tripod such as reducing camera shake. If you set the 3-second timer, you can take a photo without pushing the button which can otherwise shake your phone and decrease the sharpness of your photo.
A tripod is also very helpful in low light situations. If you are able to manually set your shutter speed with a third-party app, you can set the shutter speed very low, capturing more light. Then you won’t have to worry about holding the phone completely still during the slow shutter.
I use this flexible tripod and selfie stick bundle for my iPhone photography. It’s very affordable and works well. It also has adapters for the GoPro and any DSLR camera.

6. Live Photo Effects
A tripod is also useful when using this hidden feature. When taking a Live Photo, the iPhone captures 1.5 seconds before you press the shutter and 1.5 seconds after, creating a 3-second clip. I write about converting a Live Photo to one normal photo in my other post containing beginner tips for iPhone photography. However, that’s not all you can do with Live Photos!
While viewing your Live Photo in the Photos app, swipe up and you should see several options such as loop, bounce, and long exposure.
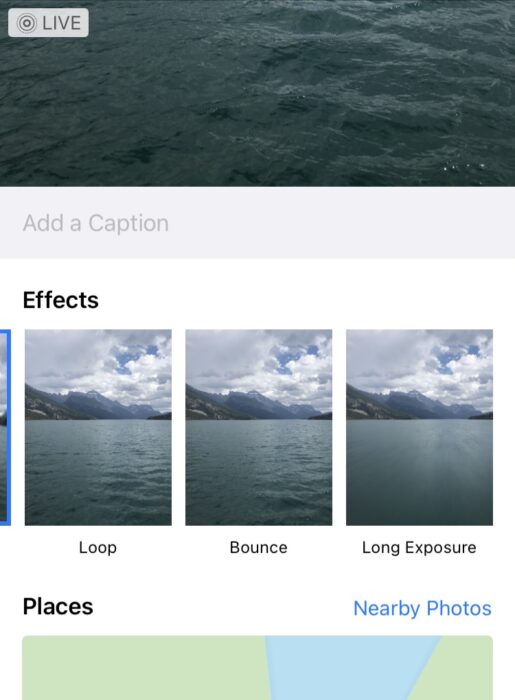
The loop effect does what you’d expect: it plays your 3-second clip in a loop over and over. The bounce effect plays the clip, reverses it, and plays it forward again indefinitely (this is the same as a Boomerang on Instagram). And lastly, the long exposure effect allows you to create some cool motion blur just like if you used a very long shutter speed on a DSLR camera. If you’re going to use the long exposure effect, a tripod will come in handy, but you could also shoot handheld if you remain very still.
7. Create Depth
Adding depth to a photo can add another level of interest. For example, moving your subject closer to you and away from the background creates more background blur (also called bokeh) and adds depth to the image.
Another way you can create depth is to use the foreground. Shooting a photo through some flowers or other objects very close to you will make the close object look blurry, creating a beautiful and interesting image.
With an iPhone, there isn’t much you can do as far as manual settings to create blurriness and depth. However, moving the subject around and using foreground interest can help with that. You can also take advantage of Portrait Mode if you have an iPhone 7 Plus, 8 Plus, or later model, and the blurriness will be added digitally. You can read more about Portrait mode in the beginner iPhone photography tips.
8. Shadows and Reflections
Instead of taking a picture of your subject, look around at the shadows or reflections the subject produces. This can give you an interesting image that tells a unique story.
9. Use Negative Space
To achieve a simple and clean look, use negative space. In other words, it’s okay to have empty space around your subject. You don’t have to fill up the frame every time, and too many details can be distracting. An image with a lot of negative space can appear minimalistic and draw more attention to the subject.

10. Shoot 4K
Your iPhone has the ability to shoot video in 4K. This will give you the highest quality video possible. Unfortunately, these videos take up a lot more space on your phone, and shooting them will drain your battery quicker.
To select the quality of video you will record, go to Settings > Camera > Record Video, and choose from the options listed.
Even though shooting in 4K takes up more space on your iPhone, these videos are top-notch quality.
I hope you enjoyed these tips for taking better iPhone photos, and I hope you will use them to improve your photography skills.
What did you think of these iPhone photography tips? Did you learn anything new? The best way to learn is to practice, so get out there and start taking great iPhone photos!
Don’t forget to subscribe to the Life Full of Light email list to get access to the resource library include travel, blogging, and photography freebies (including the Everyday Preset for Lightroom Mobile)!
Recommended:
Beginner Tips for DSLR Photography You Need to Know
The Best Time of Day to Take Photos
Travel Photographers You Should Be Following on Instagram
Keep sharing more effective blogs.